
What is noise
in photography?

Whether you’re a pro photographer, or a weekend hobbyist, there’s nothing quite like capturing a moment in a single perfect frame.


by Rachel Westbury
Regardless of your experience level, you’ll know that there are a few key aspects that make a photo truly memorable — a melding of beautiful light, thoughtful framing, and a composition that captures the essence of the moment. The one aspect that can throw off an otherwise great image? Noise.
We’ve collated this guide to help you better understand noise in photography, how to avoid it when shooting, and what you can do to reduce noise in your images during post-production.
For crisper, clearer captures — and less files in the deleted folder — keep on reading!
In this guide, we cover:
Start creating with Shorthand
It's the fastest way to publish beautifully engaging digital magazines, reports, internal comms, and more.


What is noise in photography?

Noise is a visual distortion that looks like small, discoloured pixels and specks across your image. Unlike grain, which is the warm, gritty texture commonly associated with film photography, noise is caused by digital artifacting.


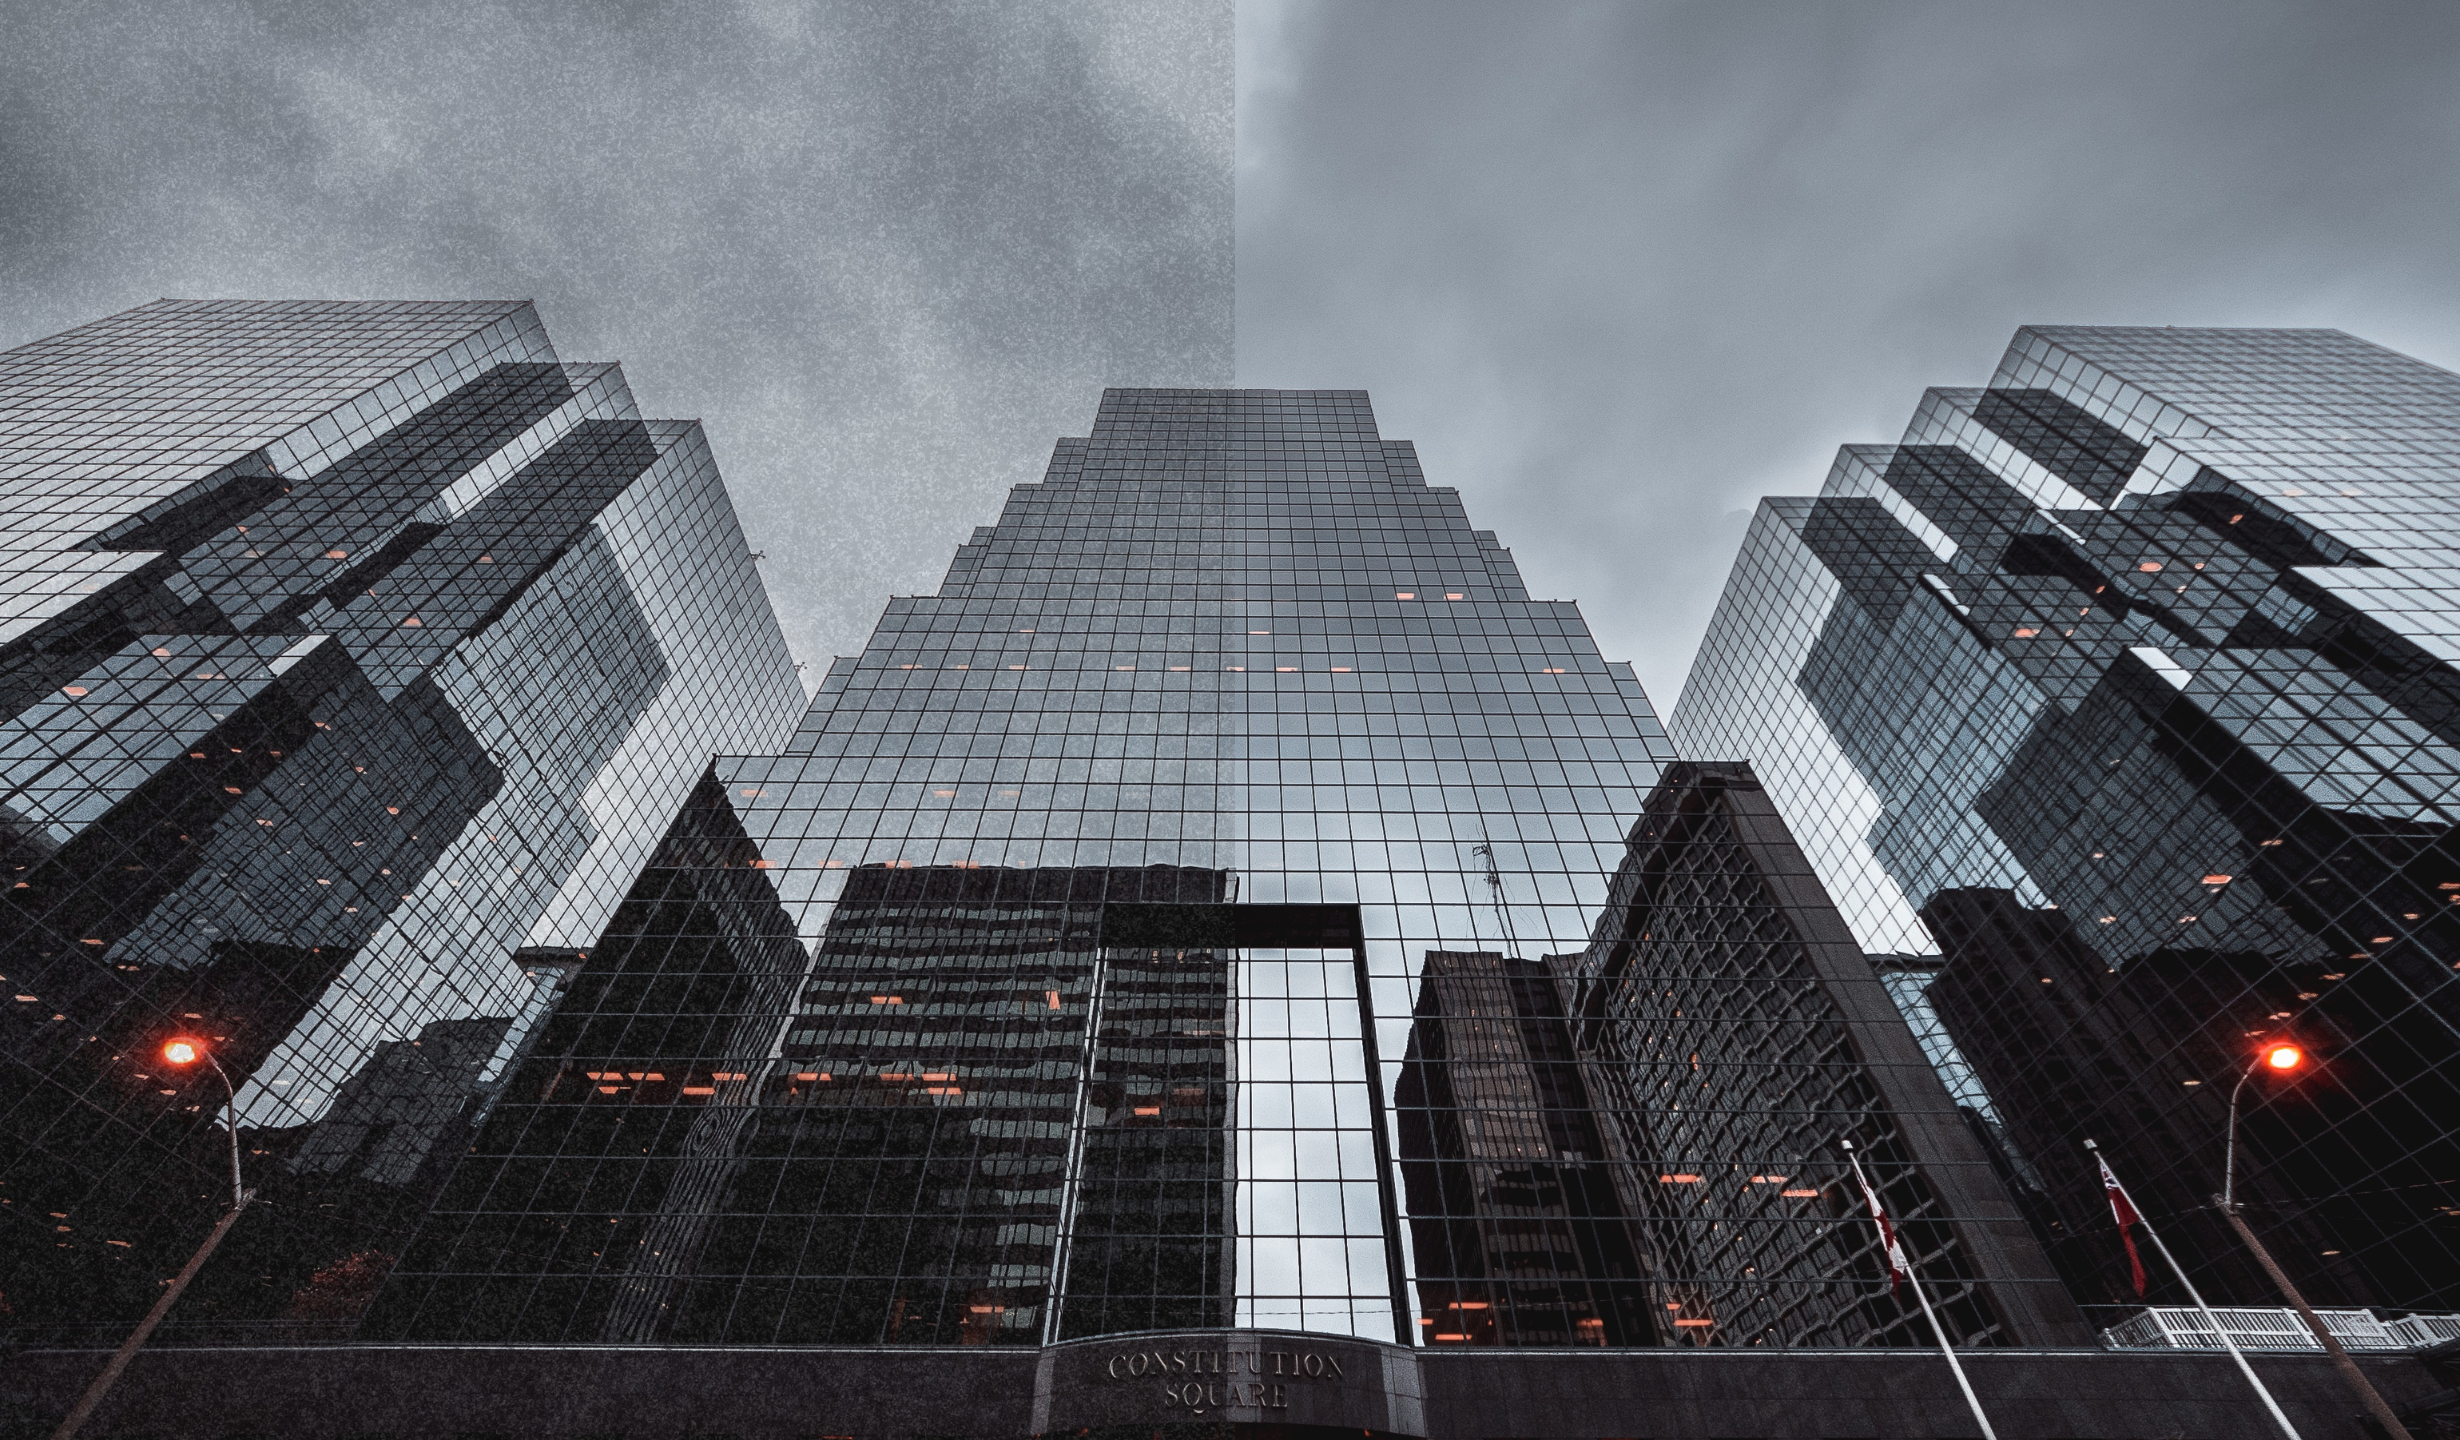
An example of image noise (left), and the noise reduced version (right).
An example of image noise (left), and the noise reduced version (right).
Noise is an expected challenge in shooting digital photography, but it can be a visual distraction that reduces the quality of your images. One of the best ways to improve your photography is to learn how to avoid or reduce the amount of noise you capture.
Looking for great examples of photography? Check out our roundup of excellent photo essays.
The 3 types of image noise

The three main types of image noise in digital photography are luminance noise, chrominance noise (or colour noise), and banding noise.
1. Luminance noise
Luminance noise is the uneven blotches and specks which appear at random in the darkest part of an image, usually due to variations in brightness (hence the name, luminance noise!).
2. Chrominance noise
Chrominance noise (or colour noise) is the distorted patches of colourful pixels which most often appear in highly saturated areas of an image.
3. Banding noise
Finally, banding noise describes the visual stripes of colour and shadow which span across sections of an image in noticeable ‘bands’.
What causes image noise?

While noise can be frustrating to deal with, there are five key elements that cause noise in your digital photography. By learning what causes image noise, you’ll be better equipped to manage these during your next photoshoot.
The five causes of image noise include:
1. High ISO
Using a high ISO increases your camera’s sensitivity to light — meaning a higher ISO, the more noise your camera will capture. To learn more, read our beginner’s guide to ISO in photography.
2. Camera sensor size
Cameras with smaller sensors tend to produce more noise compared to those with large sensors, as the smaller size reduces the ability for the sensor to gather light.
Larger camera sensors can better handle a variety of shooting conditions, particularly low light situations, and can also offer higher megapixels, less noise, and a better depth of field.
3. Shutter speed
A slow shutter speed will increase the chance of introducing noise in your images. This is because digital cameras will build noise the longer that your sensor is exposed.
4. Shadows
Areas in photos with darkness or shadows tend to show the most noise, which is caused by a lack of light in low light environments.
5. Heat
The longer you operate your camera, the more heat is generated by your camera sensor.
An increase in heat leads to an increase in noise, which can occur when shooting long exposures (for example, like the particularly long exposures used in landscape and low light astro-photography).
Tips for avoiding noise

Unlike essential learnings like the rule of thirds and aperture, many photographers tend to learn about noise later in their practice — typically after they encounter it in their own images.
But thankfully, there are a few quick and simple steps that you can take to avoid noise. It’s worthwhile trying these different solutions and comparing your test shots to see which arrangement works best for your unique kit and shooting conditions.
Do your research before investing in your camera
When purchasing your gear, it’s worthwhile investing in a camera body with the largest sensor within your price range. A larger sensor will be better able to gather light, meaning it’s less likely to generate noise.
If you already have your kit sorted — never fear! There are plenty of options to mitigate noise during and after your shoot.
Opt for a low ISO
By shooting with a lower ISO, your camera will be less sensitive to light and will generally produce clearer, crisper images with less noise.
Try a tripod
If your photography calls for long exposure times due to shooting in a low amount of light, like in landscape, night sky, or light painting photography, then a tripod is an essential tool that will significantly reduce noise in your images.
Keep your kit cool
The longer you shoot, the more heat your camera will generate — causing more noise. Be mindful of your camera body’s temperature while out shooting, and give your gear a break if necessary.
More broadly, avoid shooting in high temperature locations, and be sure to store your camera gear out of direct light and heat when not in use.
Edit with care
After putting your focus and energy into shooting, it’s important to ensure you process your images with care, too.
Poor image processing techniques can actually introduce or increase the amount of noise you see.
How to reduce noise with software

There are a variety of photo editing tools available that allow you to quickly and easily reduce the amount of noise in your images. To learn more, read our round up of the top 5 free tools for editing photos.
These photo editing tools all offer noise reduction, which works by smoothing out the areas of your composition that show random variations in colour, light, and shadow that cause noise.
In most cases, noise reduction software uses a slider that allows you to adjust the amount of smoothing to suit your preferred visual style.
Here’s a quick-start guide to reducing digital noise using two of the most popular photo editing tools on the market.
Adobe Photoshop
To reduce noise using Adobe Photoshop, simply open your image file, navigate to the Filter > Noise > Reduce Noise menu option, then adjust the sliders for Move Strength, Preserve Details, Reduce Colour Noise and Sharpen Details to suit.
Adobe Lightroom
To reduce digital noise using Adobe Lightroom, first select your photograph, then click the ‘Edit’ icon. Navigate to the ‘Detail’ panel, where you’ll find the noise reduction slider. Adjust the slider to suit.
What is the difference between noise and grain?

It’s easy to mistake noise and grain — and the two words are often used interchangeably. But alas, they aren’t the same thing! Far from it, in fact.
As we’ve covered in this piece, digital noise is a type of artifacting or distortion of random pixels that reduces image quality.
Notably, noise is distinct to digital photography and occurs as part of the process of capturing images on a DSLR or digital camera. It cannot occur in images captured using film.
Whereas grain is a natural and much-loved characteristic of film photography, and refers to the random variations in film grain size that create a nostalgic filmic look. Unlike noise, grain can enhance your image quality.
You can simulate the dreamy grain look by manually adding it to your images in your post-processing workflow. Some camera bodies also allow you to adjust the amount of grain you capture in-camera — check your camera settings to explore this option.
And while many photographers are fond of filmic grain in their images, you’d be hard pressed to find many who feel the same way about noise.
What is the difference between noise reduction and noise filtering?

Noise reduction and noise filtering may sound the same, and while they are similar in terms of the result they achieve, each has its own distinct process.
Noise reduction describes the removal or reduction of digital noise in an image, typically achieved using an editing tool to smooth out the random patches of distorted pixels.
While noise filtering refers to removing (or filtering out) specific frequencies of noise from an image using an editing tool. This process is particularly useful for removing specific types of noise, such as banding noise.
Conclusion

Noise can be an utterly frustrating issue to come up against, but the techniques we’ve covered will help you reduce the visual fuzz and capture those clear, crisp compositions you’ve been working hard to create.
By using lower ISO settings, packing your tripod, and shortening your exposure lengths, you’ll already be on your way to minimising noise during your next shooting session.
And by using the noise reduction tools in photo editing apps like Adobe Lightroom and Photoshop, you also have plenty of options to help remedy those random pixel distortions in the post-production process.
Remember, you can always refer back to this guide to help troubleshoot during your next photo session. Until next time — happy snapping!